

STELLA-Q2
The STELLA-Q2 represents the most accessible entry point into NASA’s Science and Technology Education for Land/Life Assessment instrument family. This ultra-portable device (just 33g bare, 108g with housing) requires absolutely no tools for assembly—simply connect seven components with four small cables, load the CircuitPython interpreter and STELLA software, and you’re ready to collect data.
The STELLA-Q2 features three spectrometer sensors that measure irradiance in the visible and near-infrared spectrum. Its connector-only design eliminates the need for soldering, making it ideal for classroom settings and students new to scientific instrumentation. The lightweight construction has been successfully tested on consumer-level UAVs, extending its research potential to aerial applications.
Housed in an optional 3D-printed case and mountable on common items like a paint stick for field use, the STELLA-Q2 makes remote sensing technology accessible to learners of all ages while introducing fundamental concepts in engineering, programming, and environmental science.
To build your own STELLA-Q2 download the STELLA-Q2 files and follow the build steps.
STELLA-Q2 Highlights

NASA Acres Supports STELLA Workshop at American University
NASA's Science and Technology Education for Land/Life Assessment (STELLA) initiative organized a hands-on workshop for …

Building Tomorrow’s Earth Science Workforce, One Spectrum at a Time
COASTWISE (Community Observations and Analysis using Spectroscopic Techniques and Wetlands Imaging to foster Stewardship of …

Students Build AI-Powered Drone for Earth Observation | NASA SEES Internship Journey
Four high school students leveraged STELLA's accessible design, supportive community, and educational philosophy to build …
STELLA-Q2 Build Steps
| Line | QTY | Item | Cost each ($) | Manufacturer | Manufacturer PN |
|---|---|---|---|---|---|
| 1 | 1 | Thing Plus RP2040 | 20 | SparkFun | DEV-17745 |
| 2 | 1 | TRIAD spectral sensor | 70 | SparkFun | SEN-15050 |
| 3 | 1 | PCF8523 real time clock | 5 | Adafruit | 5189 |
| 4 | 1 | CR1220 battery for clock module | 1 | widely available | CR1220 |
| 5 | 1 | 128x32 OLED display | 12.5 | Adafruit | 4440 |
| 6 | 1 | i2c button | 5 | SparkFun | BOB-16842 |
| 7 | 4 | qwiic cables, 100mm | 1 | Adafruit | 4210 |
| 8 | 1 | battery disconnect switch | 3 | Adafruit | 3064 |
| 9* not used with 3D printed case | 1 | cylindrical battery, 2200mAh | 10 | Adafruit | 1781 |
| 10 | 1 | USB C cable | 5 | SparkFun | CAB-16905 |
| 11 | 1 | micro SD card | 10 | Adafruit | 1294 |
| 12 | 1 | micro SD card reader | 7 | Adafruit | 5212 |
| 13* used with 3D printed case | 1 | Lithium Ion Polymer Battery - 3.7V 400mAh | 7 | Adafruit | 3898 |
1. Download the latest STELLA-Q2 FILES.ZIP from the webpage
2. Print the diagram full size on a single sheet of regular office paper.
3. Print the plastic parts.
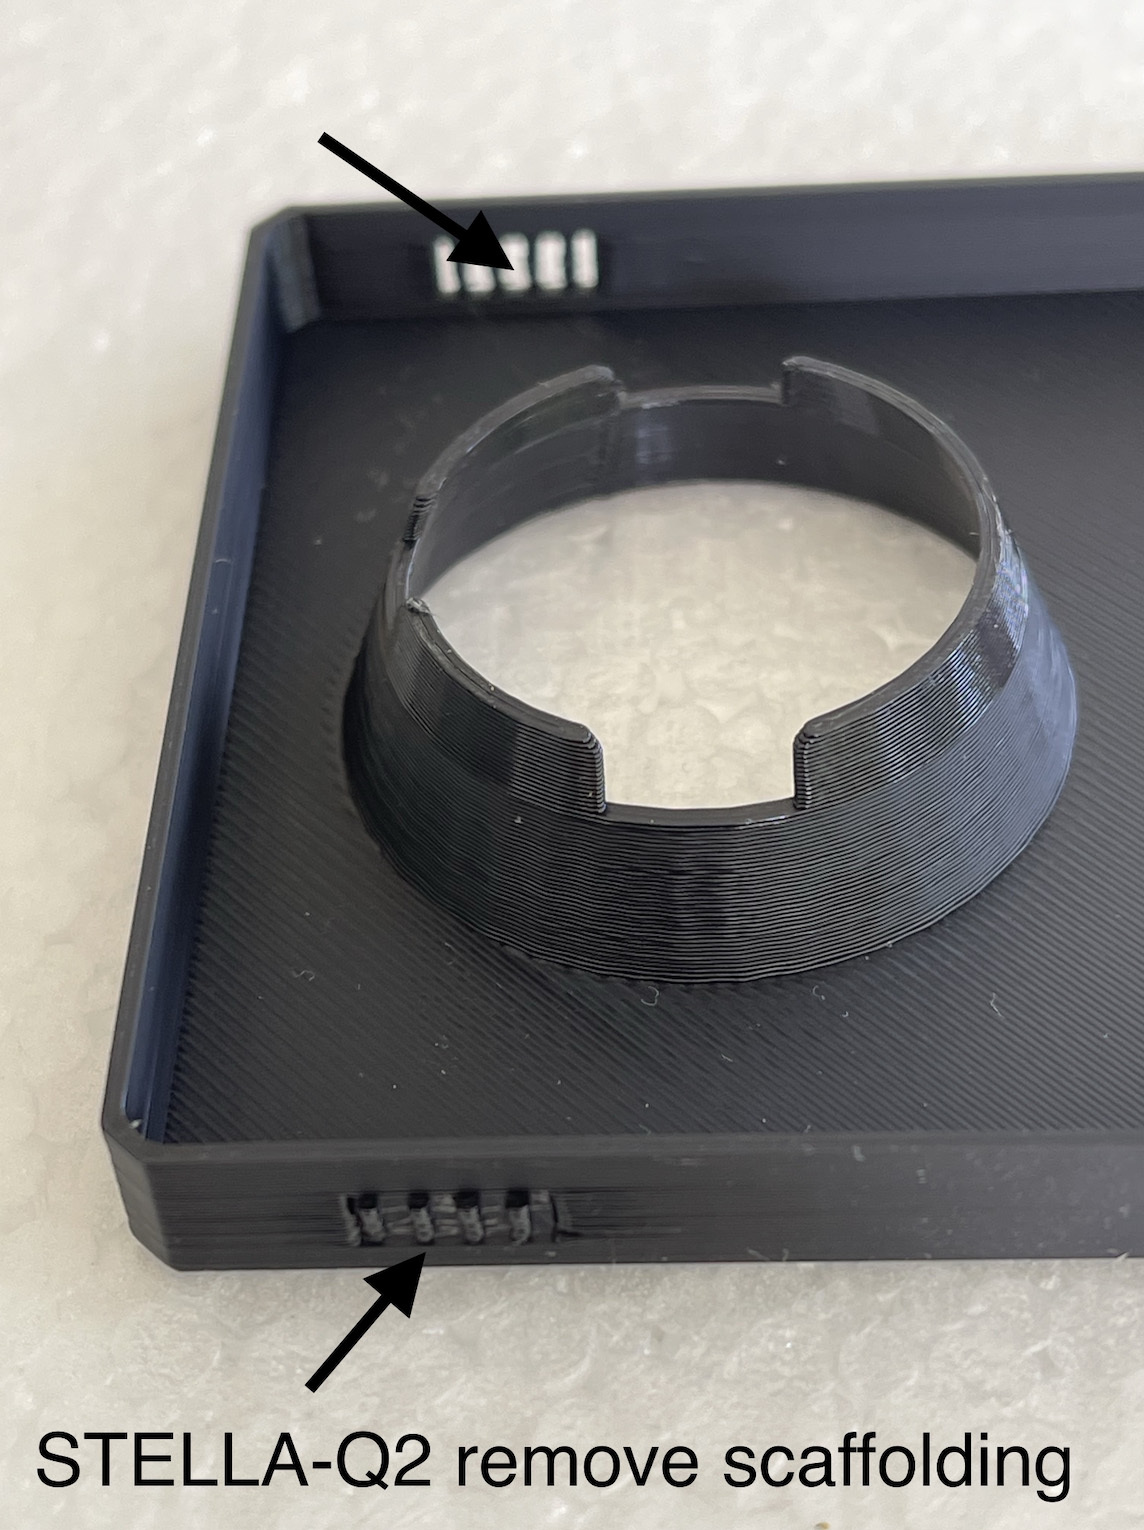
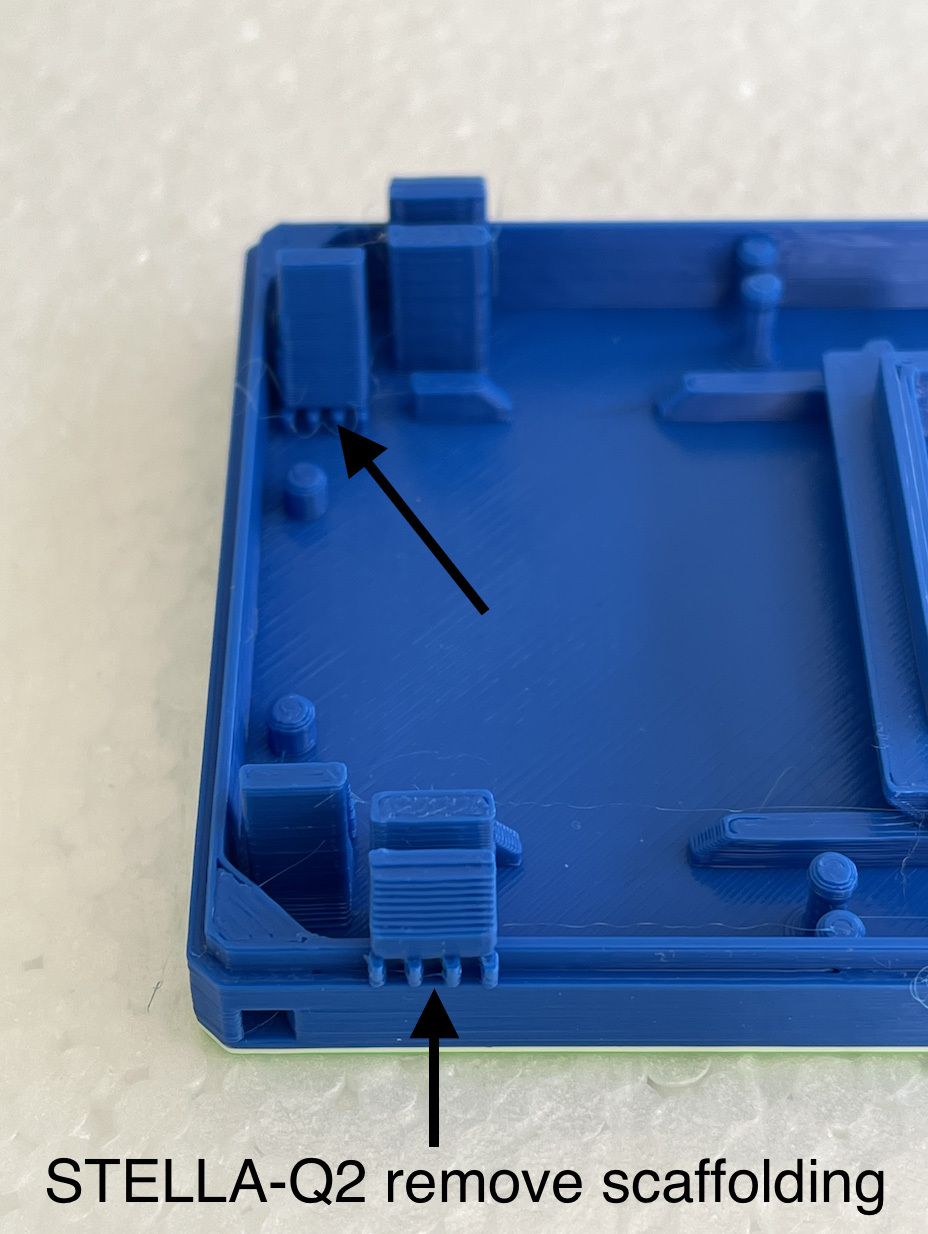
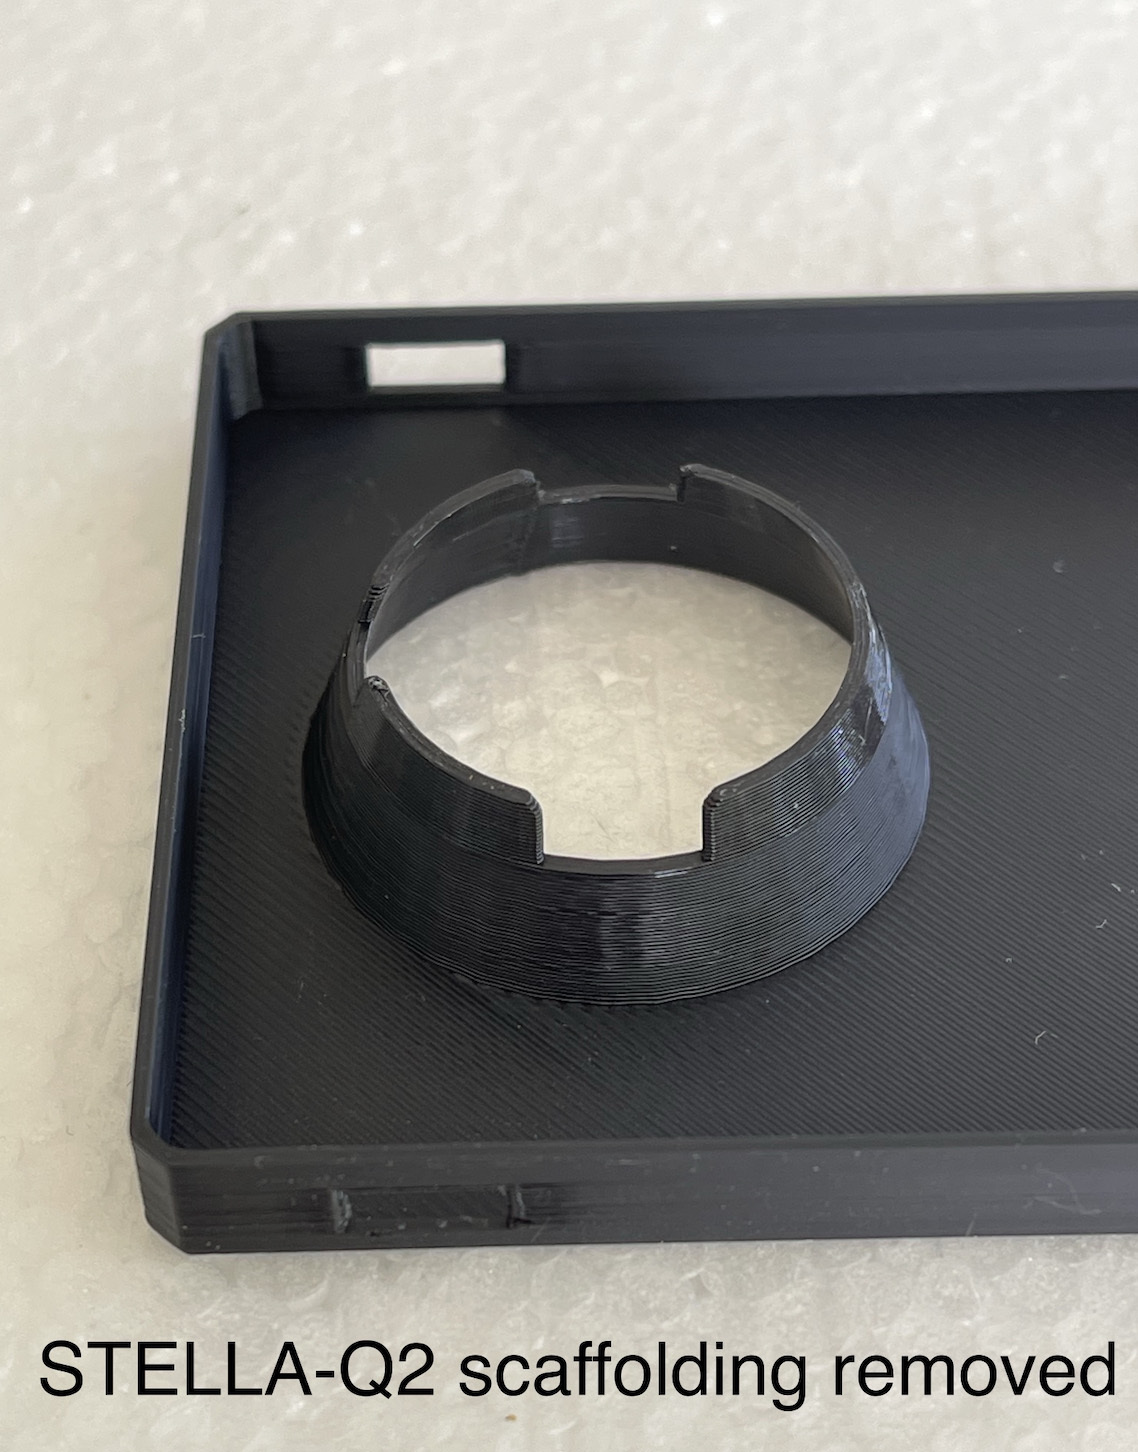
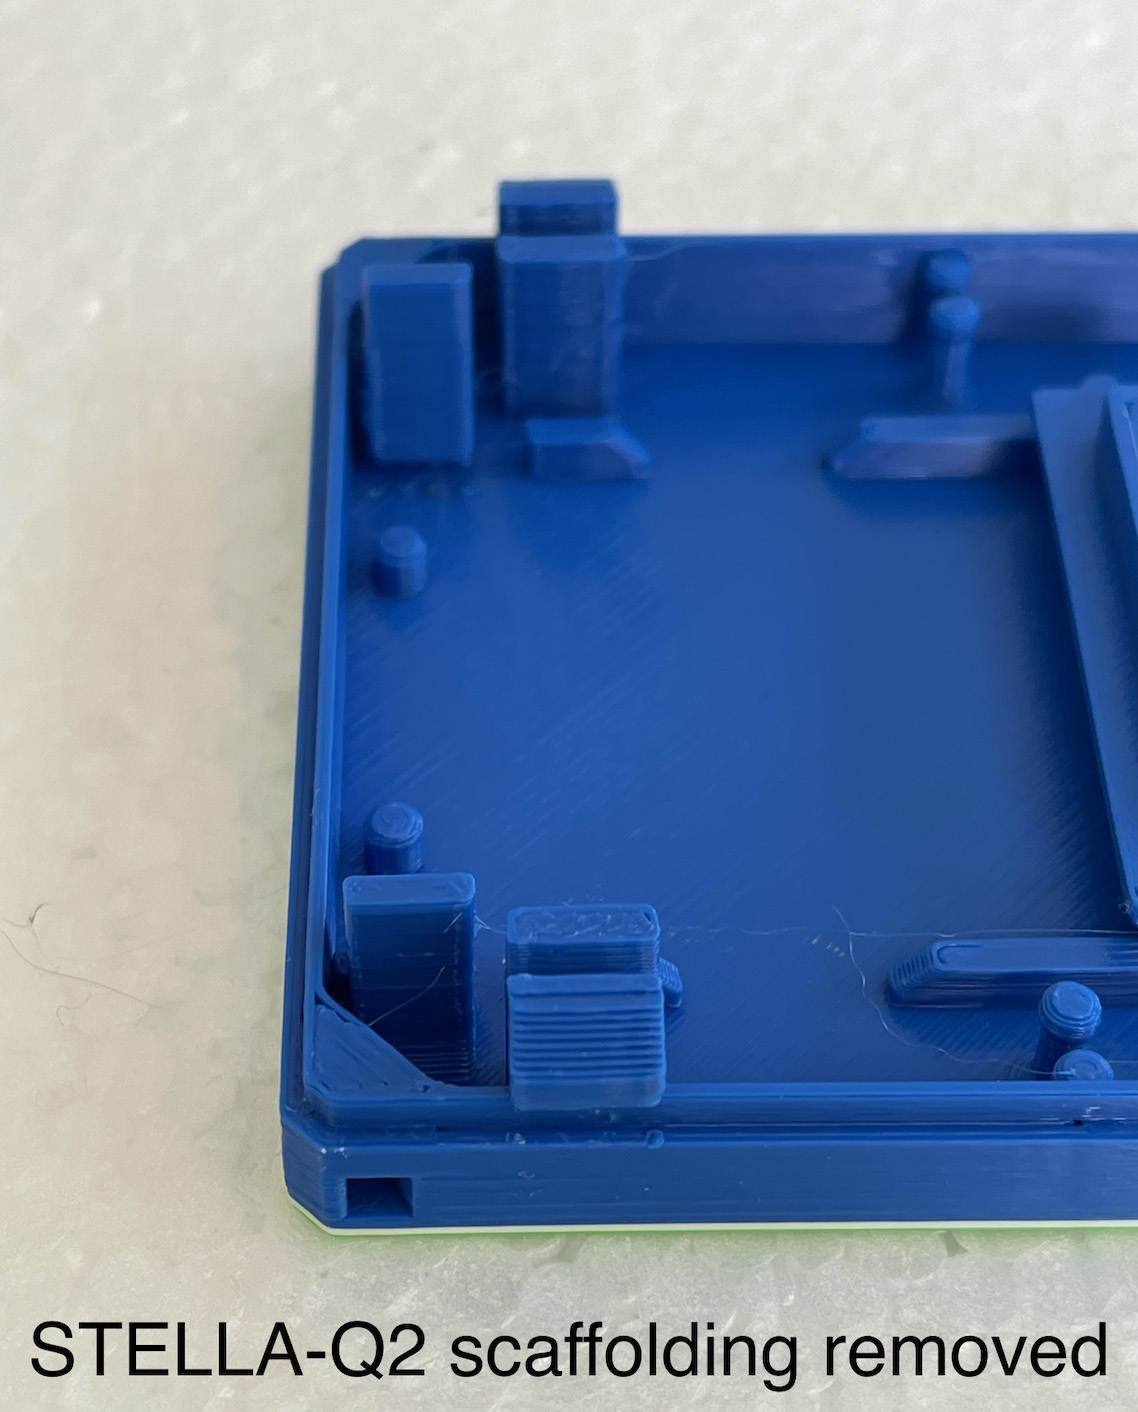
4. Remove the scaffolding from the parts. (Scaffolding photos)
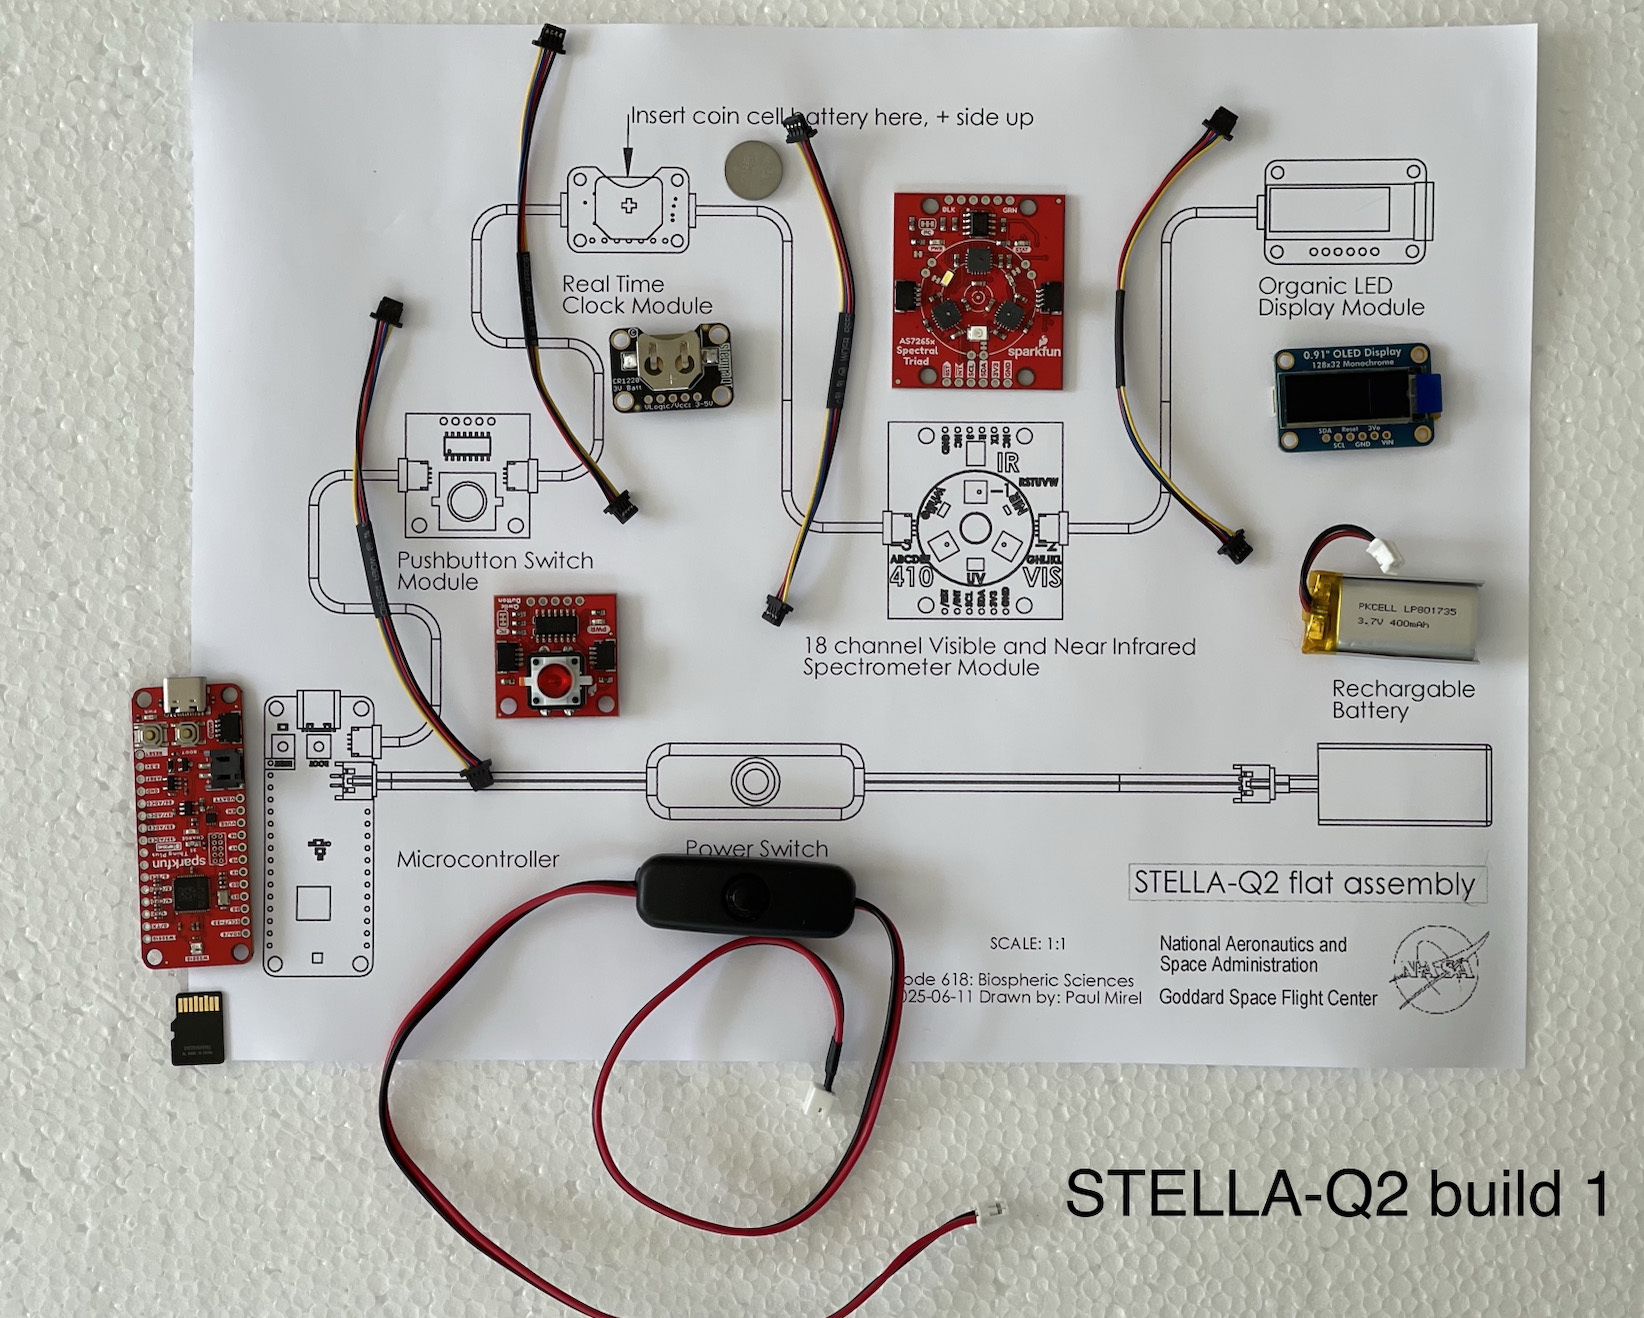
5. Lay the electronics parts out on the diagram. (Build 1 photo)
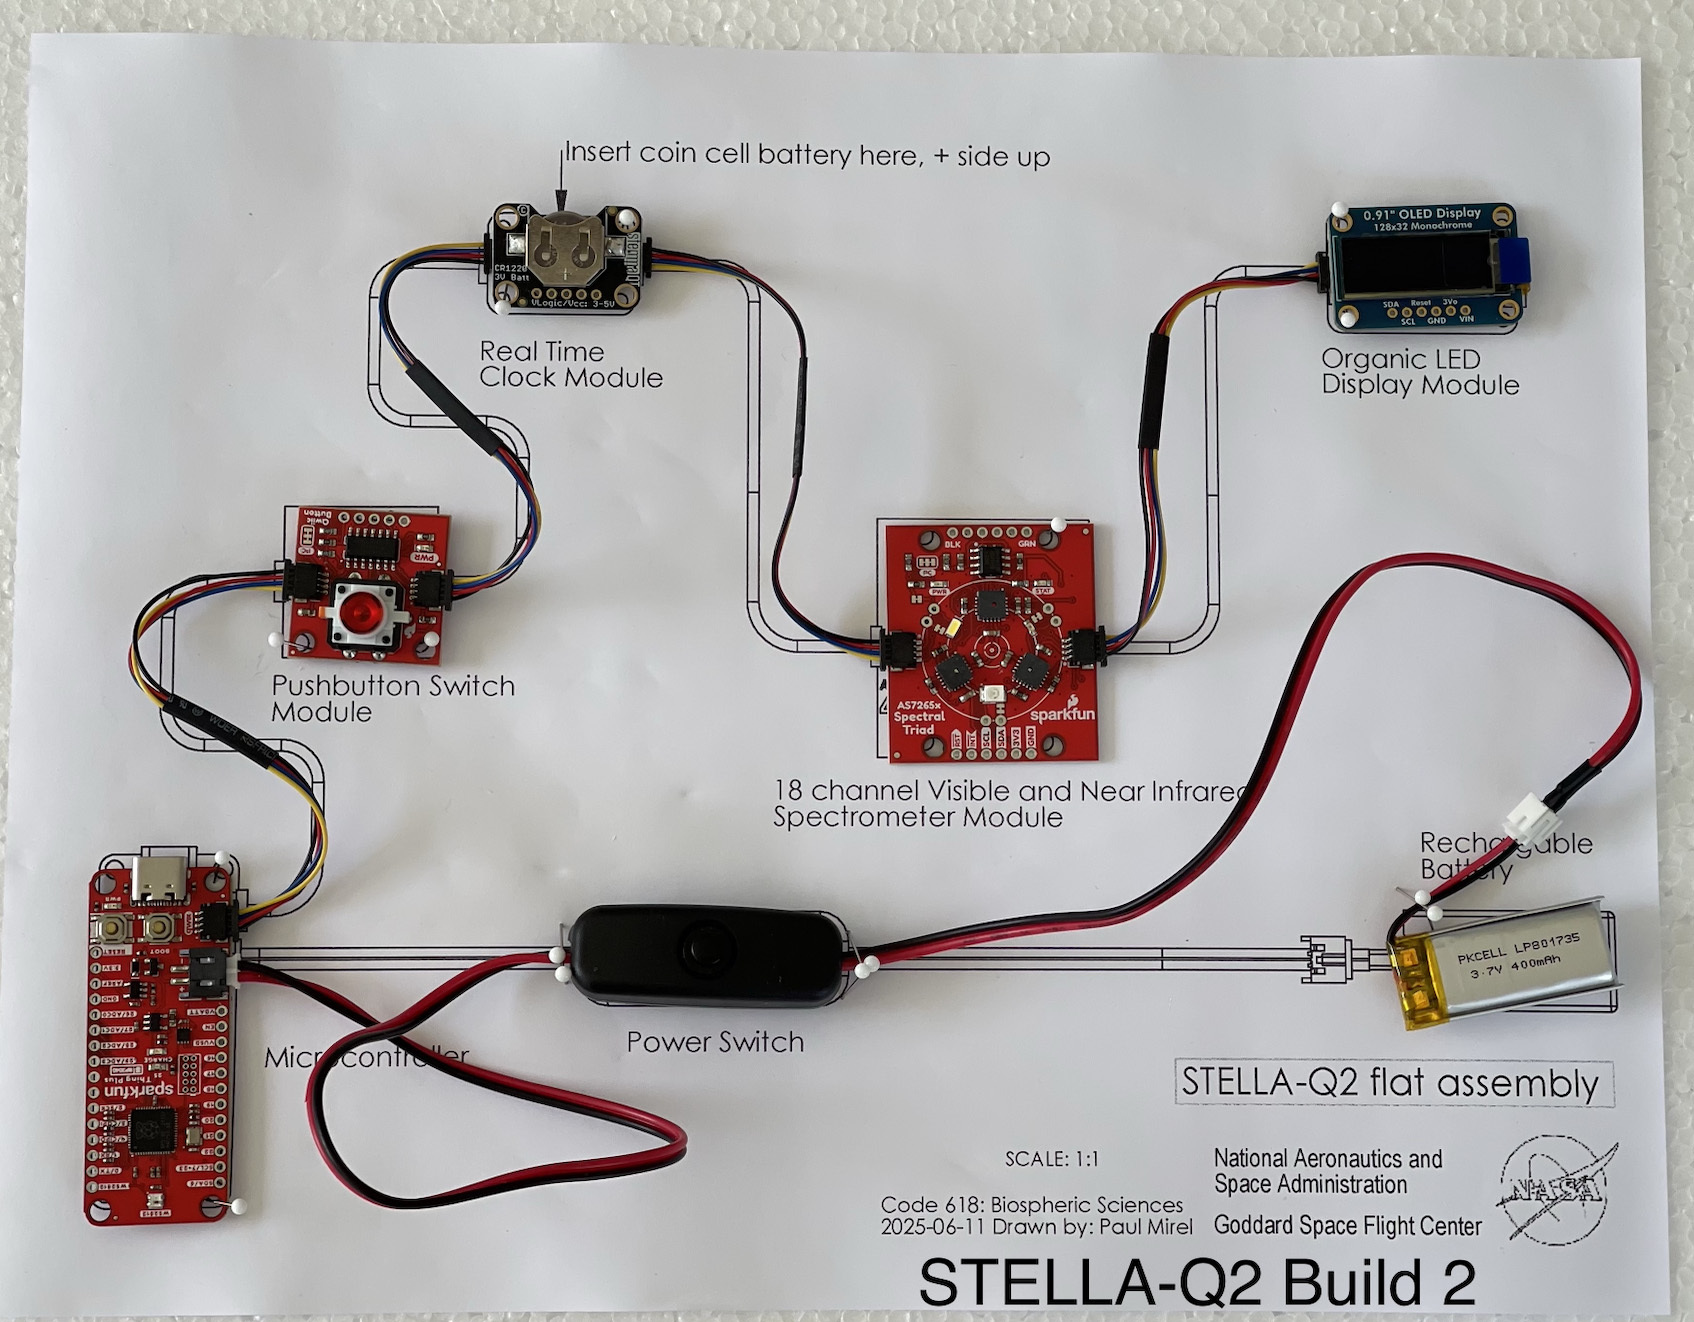
6. Connect them with cables to match the diagram. (Build 2 photo)
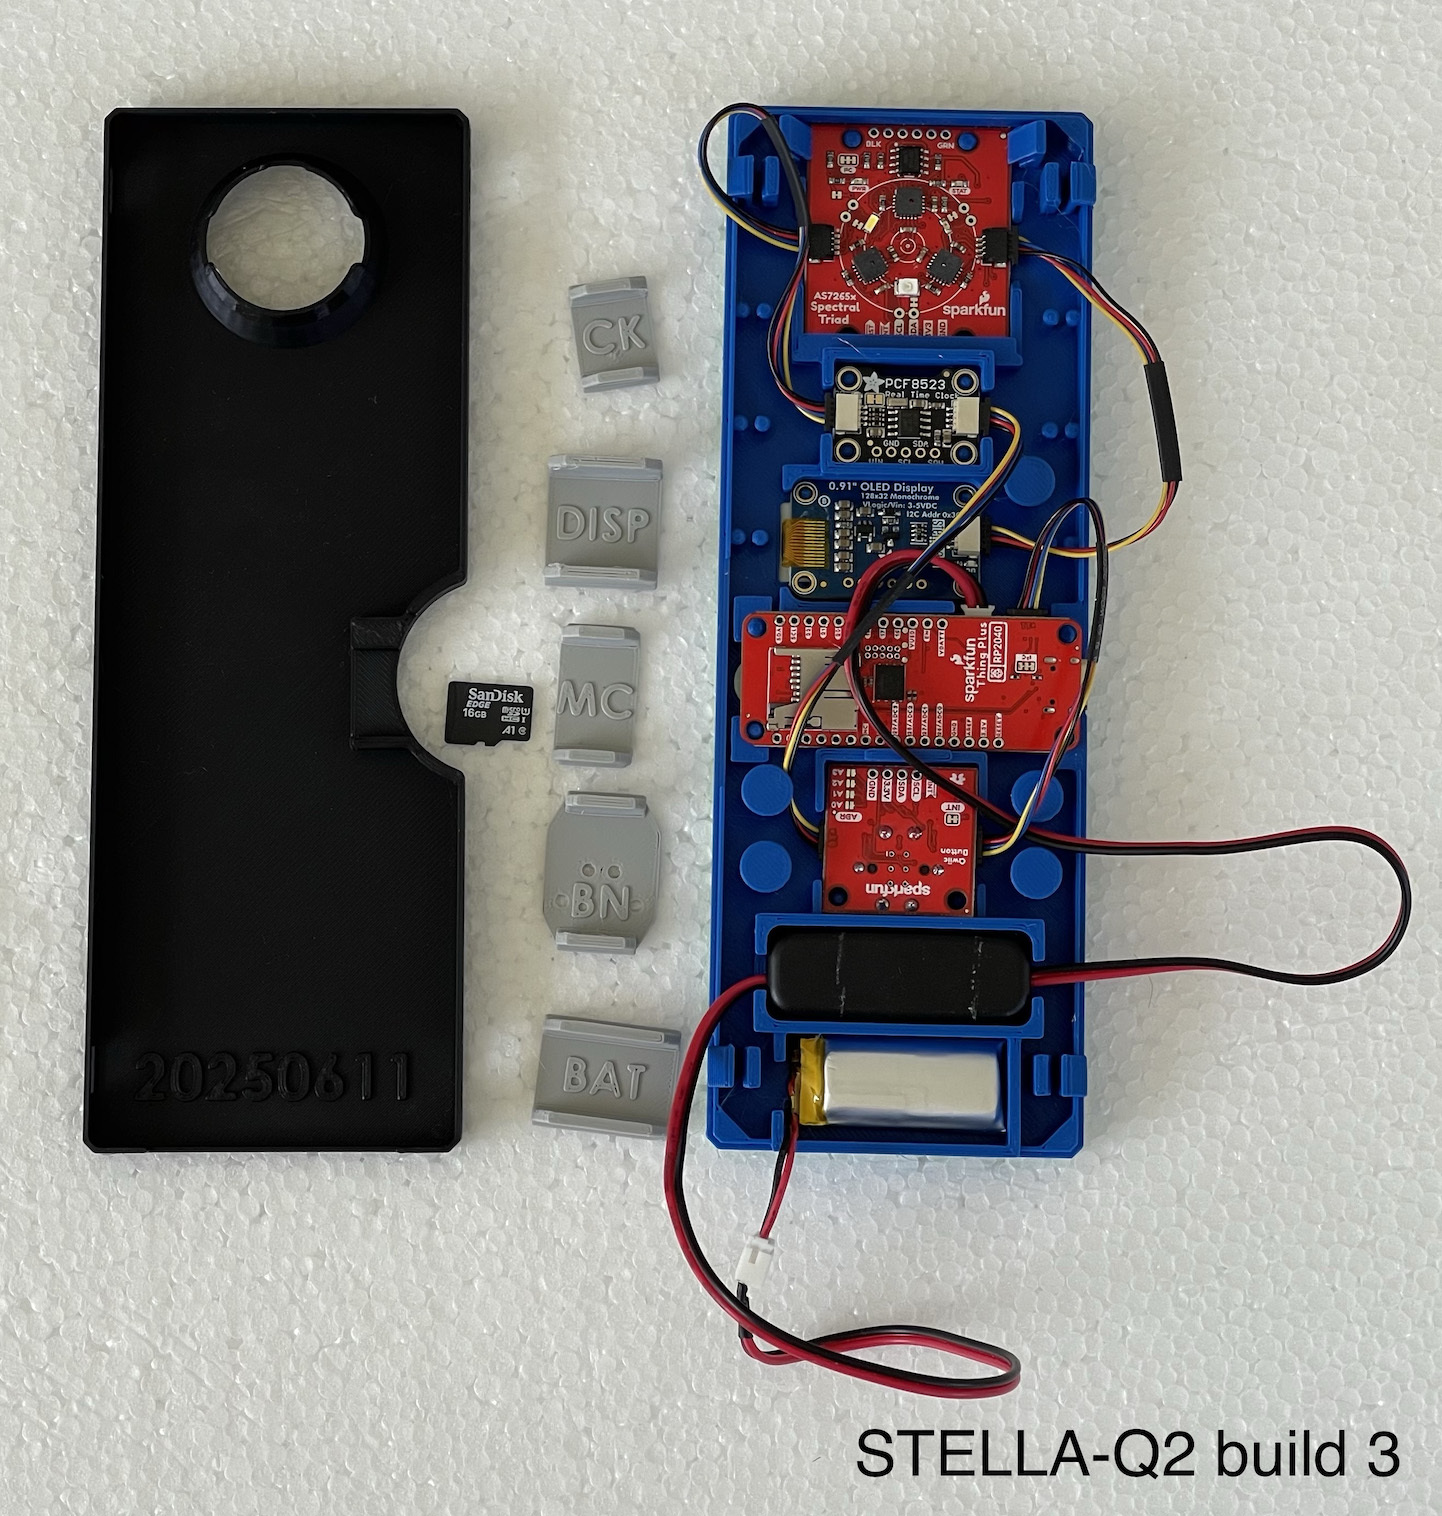
7. Place the connected parts in their respective slots to match the photograph. (Build 3 photo)
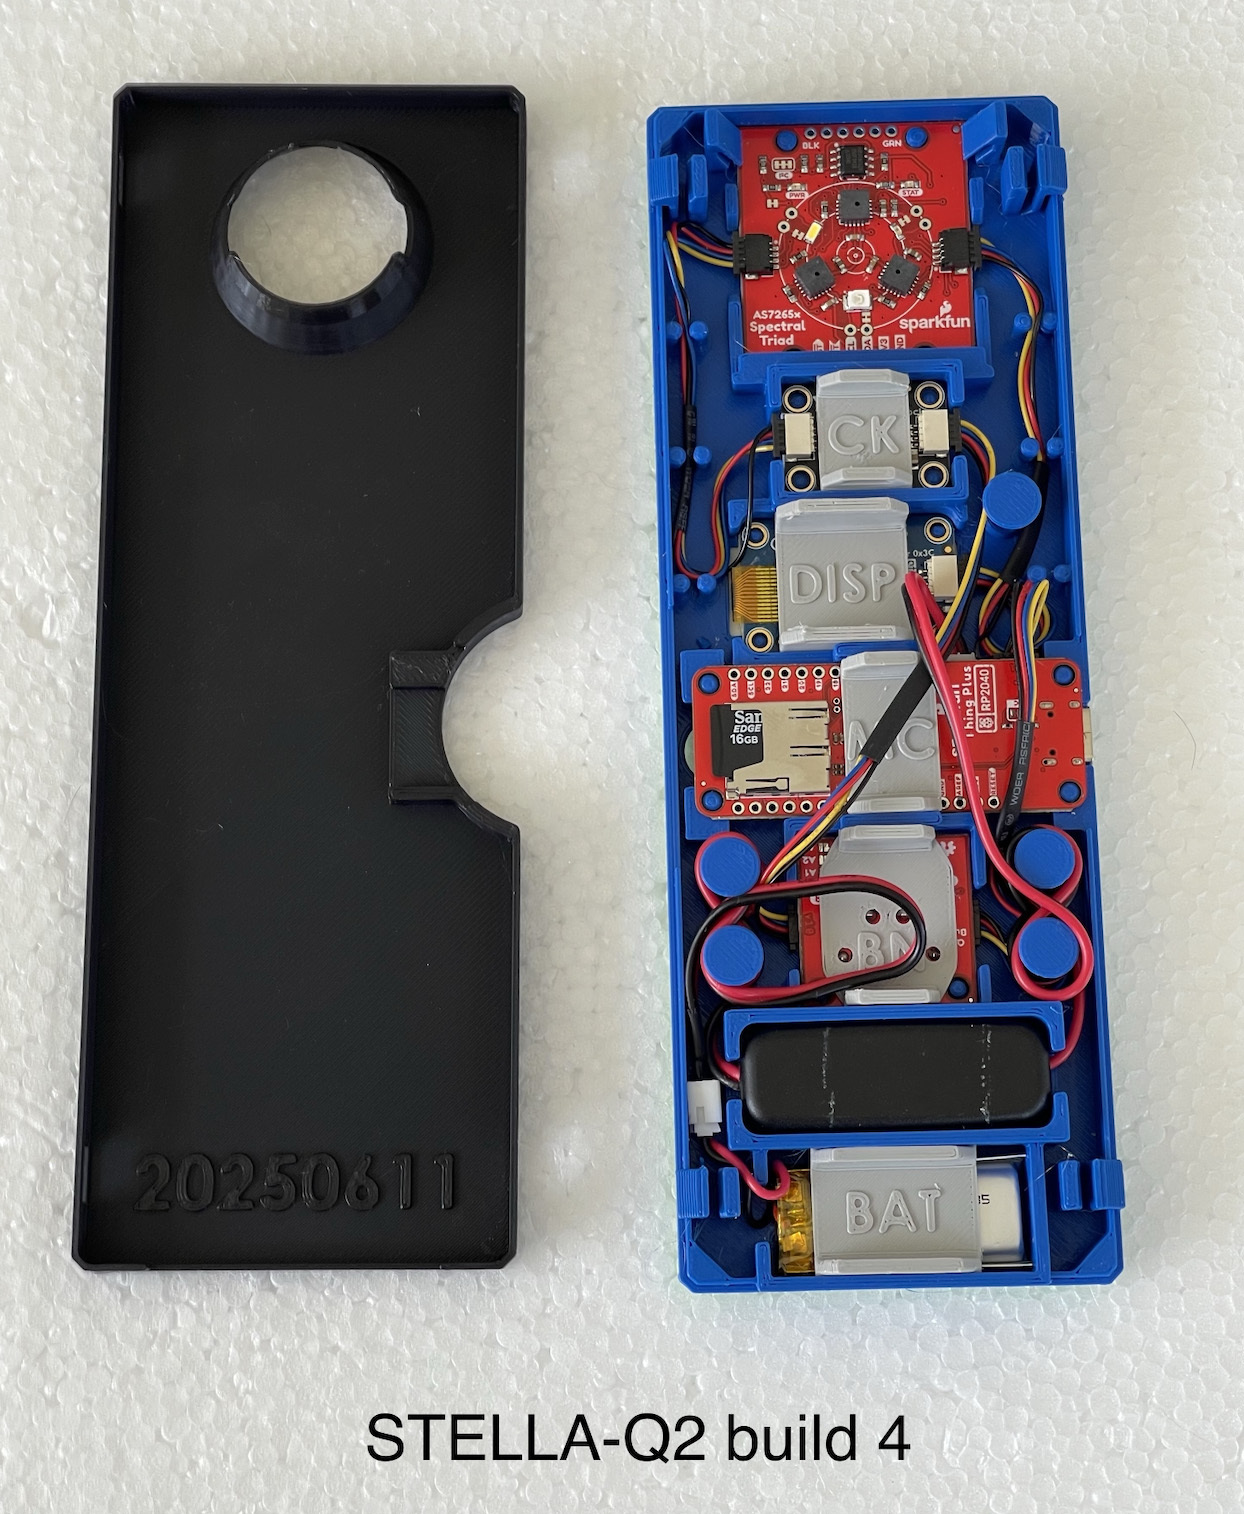
8. Route the wires to approximate the photograph. (Build 4 photo).
9. Install the retainer clips to match the photograph. (Also Build 4 photo)
10. Install the bottom cover.
11. Install the two signal lamp windows. (Lamp covers photos)

12. Connect the Q2 to the computer. If the computer asks if it’s OK to connect to the Thing Plus RP2040, click to allow the connection.
1. Break the pointy ends off a couple of toothpicks, so you have some short round rods. (Don’t use something metal, like a paperclip or wire.)
2. Drop the toothpick rods into the b and r (boot, and reset) square holes.
3. Hold down the boot button with the toothpick rod, and click and release the reset button with the second toothpick rod.
4. A drive labeled RP1-RP2 should show up on your computer’s drive list/file explorer/ finder.
5. Uncompressed/ Extract the contents of the Q2 zip file.
6. Open the UF2 folder, and drag and drop copy the file onto the RP1-RP2 drive. The filename will be adafruit-circuitpython- sparkfun_thing_plus_rp2040-en_US-x.x.x.uf2, where x is a number or numbers.
7. Allow the copy to proceed. When finished, the RP1-RP2 drive will self- eject, to be replaced by the CIRCUITPY drive.
8. Open the CIRCUITPY drive. You’ll see a boot_out.txt file, a lib folder, and a code.py file. You might also see a folder named sd. If you don’t see the sd folder, create it. Don’t put anything in it, it needs to be an empty folder and it needs that specific name.
9. Open the q2-code-and-libraries folder, to find the code.py and the lib folder.
10. Copy both, the lib folder and the code.py file, onto the CIRCUITPY drive.
11. Your computer will ask if you want to replace the existing files. You do. Replace, don’t Merge.
12. Once the copying is done, you will have, if all goes well, a working Q2 instrument.
Date and time set instructions: Setup: You’ll need to set the date and time.
1. Open a Chrome browser window on your computer. It has to be Chrome for this to work.
2. Navigate to https://code.circuitpython.org/
3. Select USB as your type of connection.
4. Then click on the Connect to Device button.
5. Choose the device named Thing Plus RP2040(cu.usbmodemx), where x is a four digit number.
6. Then click the Use CIRCUITPY to select the USB host folder.
7. Your computer may ask if Google Chrome.app may access files on a removable volume. Allow this.
8. On the bottom of the browser window, there are two buttons, Editor and Serial. Click on the Serial button to open a Serial dialogue panel. That’s where you’ll set the time.
9. Click the Restart button at the top of the serial panel to restart the Q2 instrument program. You’ll see a lot of output go by. You can safely ignore it, or look at the code later if you are interested in finding out about those lines.
10. Hold down the MODE button on the Q2 for a good long time ~10s, until the serial dialogue reports:
long_press
The date is Sunday 2093-5-12 The time is 15:44:52
Current year is 2093. Enter a new year and press return, or press return to skip.
Your values for date and time will likely be different.
Date and time set instructions: Enter the new date and time.
1. Enter the correct year, by clicking in the serial panel and then typing the year number. (2025 at the time of this writing)
2. Do the same for month, and for day.
3. For the UTC time, look up the correct hour at https://time.is/UTC or something similar. Geospatial instruments use UTC time to avoid confusion about timezones and daylight savings time shifts.
4. Enter the correct hour for UTC, and then the minutes and seconds, and
then the three letter code listed for the day of the week.
5. After you enter the day, the instrument will return to regular function. You can unplug the Q2 instrument from the computer and go measure the spectra of light reflected off of things! (Don’t point the sensor at the sun, as it’s too bright for the sensor and will likely damage it.)
If you want to check the time, restart the instrument and look at the display screen.
STELLA-Q2 Optical Adapter
Universal 1.25″ Optical Coupling for Multi-Scale Spectroscopy
The STELLA Optics Adapter connects your STELLA-Q2 spectrometer (STELLA-1.2 RS support coming soon) to any telescope, microscope, or optical system with a standard 1.25″ eyepiece socket. This simple adapter transforms STELLA into a precision optical spectroscopy tool, narrowing the native 20° field of view to approximately 1° when paired with a 20x telescope—providing 20x improvement in spatial resolution. Point your adapted STELLA at celestial objects to teach astronomical spectroscopy, at distant terrestrial targets for high-resolution environmental monitoring, or through a microscope to characterize bacterial cultures and tissue samples by spectral absorption.
Setup is simple: Attach the adapter to STELLA-Q2, insert into the 1.25″ eyepiece socket, point at your target (Sun, light source, or sample), then spread wax paper over the eyepiece and defocus until light evenly covers the entire eyepiece—this ensures uniform illumination across all 18 spectral sensor channels for accurate measurements. From microscopic cells to distant stars, the STELLA Optics Adapter enables students to experience how spectroscopy serves as a universal measurement tool across all scales of scientific investigation, bridging molecular biology, environmental science, and astronomy with a single affordable instrument.


STELLA-Q2 Operation
Charging:
The Thing Plus RP2040 microcontroller has a built-in lithium battery charger. When the microcontroller is connected to USB, it will try to charge the battery. Since there is a switch in between the battery and the microcontroller, the charging circuit can only charge the battery when the power switch is on.
Start the Q2 by itself, disconnected from power, to make sure that it’s on.
Then connect the Q2 to a USB-C power source to charge the battery.
The orange light above the battery icon on the Q2 will come on full brightness when the battery is charging. When the battery is fully charged, the orange light will turn off. If the orange light is dim or flickering, the charging circuit is not connected to the battery.
The MODE button:
The microcontroller does not respond quickly to the button. It may take as much as half a second to register that you have pushed the button. The button light itself will light up to let you know that the microcontroller has detected your push.
Click it once to change from continuous recording to burst recording, detailed below.
Click it again to measure and record a single burst of measurements.
Hold it for 2-3 seconds to turn the lamps on or off. More detail below. Hold it for greater than 10 seconds to set the clock. Lots more detail below.
Recording:
The REC light on the Q2 will light up orange during startup, if the SD card is installed.
The REC light will show red if there’s no SD card installed. After startup, the REC light will flash green each time the instrument records a datapoint.
Green indicates that the instrument is in continuous recording mode.
If you push the MODE button, the instrument will exit continuous recording mode, and enter burst mode.
There after, when you push the MODE button, the instrument will take one burst of data points and stop.
Blue indicates that the instrument is recording in burst mode. The light will flash blue once for each data point recorded.
Press the button again to take another burst of data points.
The burst count, and the sample interval for continuous recording, are located at the top of the code.py file that contains the instrument code. Edit that file on the CIRCUITPY drive to change those values.
Lamps:
Hold the button for 2-3 seconds to turn on the LED lamps on the spectrometer board. The three lamps emit light in the visible, near infrared, and ultraviolet, respectively.
Hold the button for 2-3 seconds again to turn the lamps off.
Set the instrument clock:
If you hold the button for a little longer than 10 seconds, the instrument will enter clock set mode. You’ll need to connect the instrument to a computer in order to set the time.
To clear the instrument out of clock set mode, either set the clock as below, or turn the instrument off and restart it.
Date and time set instructions: Setup:
You’ll need to set the date and time.
- Open a Chrome browser window on your computer. It has to be Chrome for this to work.
- Navigate to https://code.circuitpython.org/
- Select USB as your type of connection.
- Then click on the Connect to Device button.
- Choose the device named Thing Plus RP2040(cu.usbmodemx), where x is a four digit number.
- Then click the Use CIRCUITPY to select the USB host folder.
- Your computer may ask if Google Chrome.app may access files on a removable volume. Allow this.
- On the bottom of the browser window, there are two buttons, Editor and Serial. Click on the Serial button to open a Serial dialogue panel. That’s where you’ll set the time.
- Click the Restart button at the top of the serial panel to restart the Q2 instrument program. You’ll see a lot of output go by. You can safely ignore it, or look at the code later if you are interested in finding out about those lines.
- Hold down the MODE button on the Q2 for a good long time ~10s, until the serial dialogue reports: long_press The date is Sunday 2093-5-12 The time is 15:44:52 Current year is 2093. Enter a new year and press return, or press return to skip.
Your values for date and time will likely be different.
Date and time set instructions:
- Enter the new date and time. Enter the correct year, by clicking in the serial panel and then typing the year number. (2025 at the time of this writing)
- Do the same for month, and for day.
- For the UTC time, look up the correct hour at https://time.is/UTC or
something similar. Geospatial instruments use UTC time to avoid confusion about timezones and daylight savings time shifts. - Enter the correct hour for UTC, and then the minutes and seconds,
and then the three letter code listed for the day of the week. - After you enter the day, the instrument will return to regular function.
You can unplug the Q2 instrument from the computer and go measure
the spectra of light reflected off of things! (Don’t point the sensor at
the sun, as it’s too bright for the sensor and will likely damage it.)
If you want to check the time, restart the instrument and look at the display
screen.
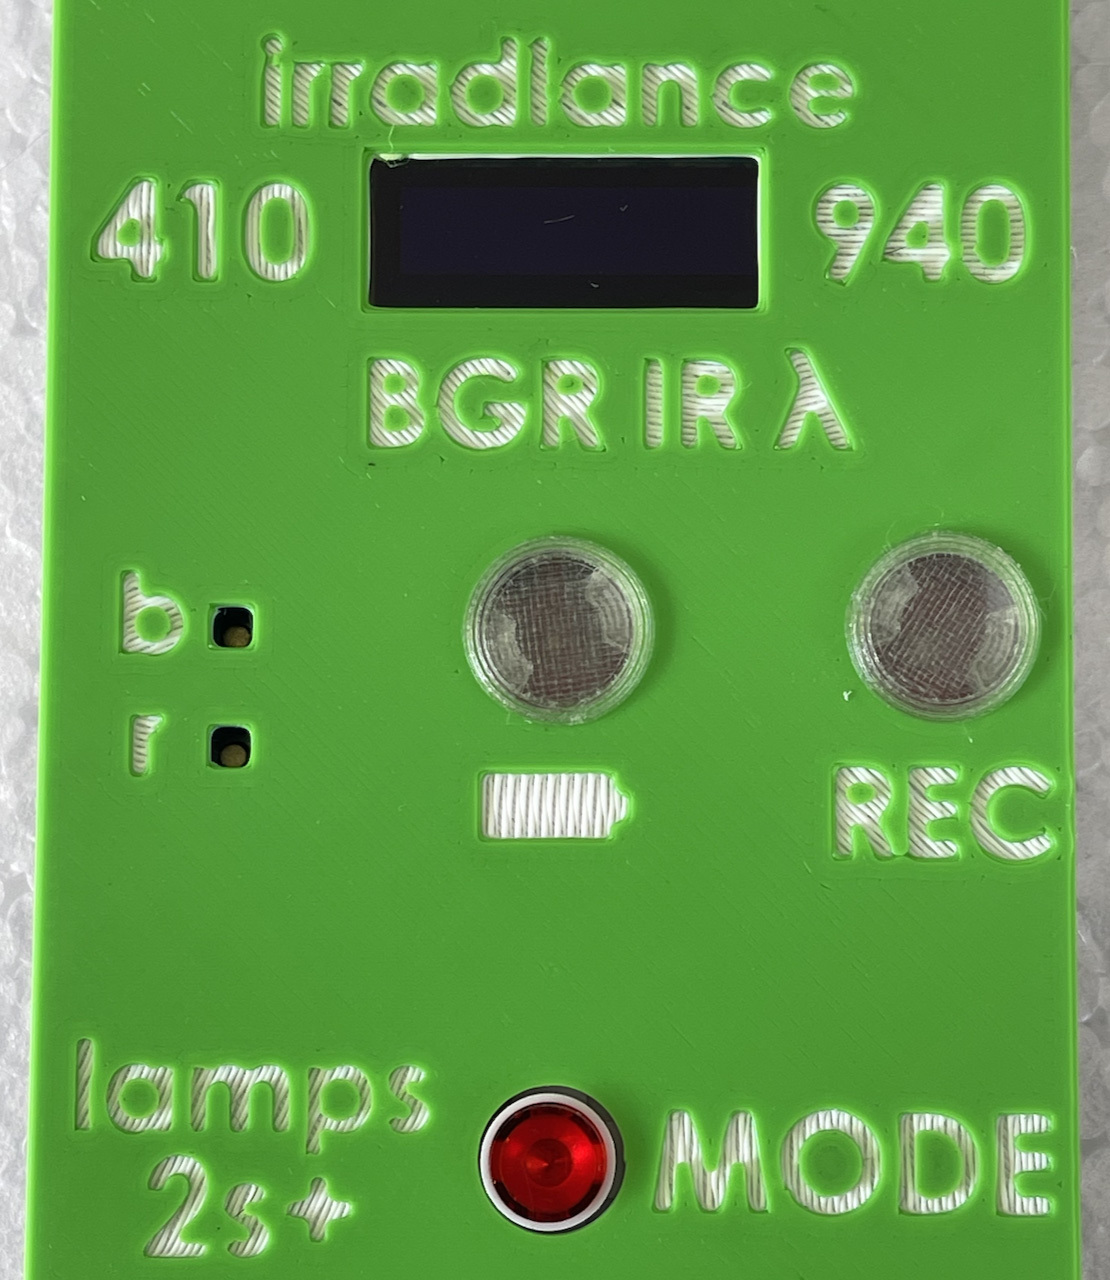
The Graph:
The instrument display shows a graph of irradiance (a measure of brightness) over
wavelength. The wavelengths on the x-axis cover 410nm to 940nm. A nanometer,
abbreviated nm, is one billionth of a meter. Around 400 to 700 nm wavelength light
is visible to human eyes, with some exceptions for color-blindness.
The shorter wavelength light is blue, marked below the graph by B.
Medium visible wavelength light is green, marked below by G.
Longer wavelengths of light, in the middle of this graph, are red, marked by R.
Longer wavelengths than red are invisible to human eye, so we call them “below red” or infrared, marked by IR.
The irradiance values on the y-axis can be displayed on a linear scale or a log scale. This setting is in the code.py file, near the top.
When displaying in log scale, a black “log y” will show on the bottom of the graph on the left.
When displaying in linear scale, no text will show.
Color Lookup Table
| NASA STELLA-Q2 / RS Module Color Lookup Table | |||||||||||
|---|---|---|---|---|---|---|---|---|---|---|---|
| AS7265x Bands | Category | Example | HTML value | Tricolor values | … | f = c / λ | E = h * f | Energy (J) / (e*V/J) = Energy in e*V | |||
| Band Designation | Band middle wavelength ( λ ) | Color | Color | Color | Color | Band middle Frequency ( f ) | Energy per photon | Energy per photon | |||
| Channel | nanometers | HTML Name | Swatch | Hexadecimal | R, G, B | THz | Joules per photon | electron*Volts per photon | |||
| 1 | 410 | Blueviolet | | #7e00db | 126, 0, 219 | 731 | 4.84E-19 | 3.0 | |||
| 2 | 435 | Blue | | #2300ff | 35, 0, 255 | 689 | 4.57E-19 | 2.9 | |||
| 3 | 460 | Royalblue | | #007bff | 0, 123, 255 | 652 | 4.32E-19 | 2.7 | |||
| 4 | 485 | Darkturquoise | | #00eaff | 0, 234, 255 | 618 | 4.10E-19 | 2.6 | |||
| 5 | 510 | Lime | | #00ff00 | 0, 255, 0 | 588 | 3.89E-19 | 2.4 | |||
| 6 | 535 | Chartreuse | | #70ff00 | 112, 255, 0 | 560 | 3.71E-19 | 2.3 | |||
| 7 | 560 | Greenyellow | | #c3ff00 | 195, 255, 0 | 535 | 3.55E-19 | 2.2 | |||
| 8 | 585 | Yellow | | #ffef00 | 255, 239, 0 | 512 | 3.40E-19 | 2.1 | |||
| 9 | 610 | Orange | | #ff9b00 | 255, 155, 0 | 491 | 3.26E-19 | 2.0 | |||
| 10 | 645 | Red | | #fe0000 | 254, 0, 0 | 465 | 3.08E-19 | 1.9 | |||
| 11 | 680 | Red | | #df0000 | 223, 0, 0 | 441 | 2.92E-19 | 1.8 | |||
| 12 | 705 | Red | | #c90000 | 201, 0, 0 | 425 | 2.82E-19 | 1.8 | |||
| 13 | 730 | Firebrick | | #b10000 | 177, 0, 0 | 411 | 2.72E-19 | 1.7 | |||
| 14 | 760 | Darkred | | #940000 | 148, 0, 0 | 394 | 2.61E-19 | 1.6 | |||
| 15 | 810 | Near Infrared | | #000000 | 0, 0, 0 | 370 | 2.45E-19 | 1.5 | |||
| 16 | 860 | Near Infrared | | #000000 | 0, 0, 0 | 349 | 2.31E-19 | 1.4 | |||
| 17 | 900 | Near Infrared | | #000000 | 0, 0, 0 | 333 | 2.21E-19 | 1.4 | |||
| 18 | 940 | Near Infrared | | #000000 | 0, 0, 0 | 319 | 2.11E-19 | 1.3 | |||
| Constants and metric prefix notation | |||||||||||
| Parameter | Abbreviation | Units | Scientific notation | Decimal | |||||||
| Speed of light | c | m/s | 3.000E+08 | 299,792,458 | |||||||
| Planck’s constant | h | kg*m^2/s = J/Hz | 6.626E-34 | 6.62607E-34 | |||||||
| Joules per electron*Volt | J/eV | J/eV | 1.602E-19 | 1.60218E-19 | |||||||
| one-trillionth, pico- | p | 1.0E-12 | 0.000000000001 | ||||||||
| one-billionth, nano- | n | 1.0E-09 | 0.000000001 | ||||||||
| one-millionth, micro- | µ | 1.0E-06 | 0.000001 | ||||||||
| one-thousandth, milli | m | 1.0E-03 | 0.001 | ||||||||
| [units] | 1 | 1 | |||||||||
| thousand, kilo | k | 1E+03 | 1,000 | ||||||||
| million, Mega | M | 1E+06 | 1,000,000 | ||||||||
| billion, Giga | G | 1E+09 | 1,000,000,000 | ||||||||
| quadrillion, Tera | T | 1E+12 | 1,000,000,000,000 | ||||||||